TL;DR:
- Regular pressure washing improves safety, extends surface lifespan, and enhances resident retention.
- Proper preparation, safety measures, and a structured process prevent damage and ensure effective cleaning.
- Consistent, scheduled exterior cleaning offers high ROI by reducing repair costs and boosting curb appeal.
Slippery walkways after a rainstorm. Tenant complaints about grimy building facades. Dark mold creeping across shared entryways. These aren't just aesthetic problems — they're liability issues and lease renewal killers. Property managers who treat exterior cleaning as an afterthought often face the consequences: higher turnover, slip-and-fall incidents, and surface damage that compounds every season. This guide walks you through every critical phase of apartment building pressure washing, from assembling the right equipment to verifying your results and locking in a schedule that actually holds. Follow these steps and you'll protect your property, satisfy your residents, and avoid the expensive repairs that come from neglect.
Table of Contents
- Why pressure washing matters for apartment buildings
- Preparation: Tools, materials, and safety essentials
- Step-by-step apartment building pressure washing process
- Troubleshooting and avoiding common mistakes
- Verifying results and setting the right maintenance schedule
- Our perspective: The hidden ROI of methodical pressure washing for apartments
- Need professional pressure washing? We can help
- Frequently asked questions
Key Takeaways
| Point | Details |
|---|---|
| Routine pays off | Frequent pressure washing prevents damage, reduces hazards, and boosts building value. |
| Preparation is critical | Proper tools, prep, and safety steps minimize accidents and ensure thorough cleaning. |
| Step-by-step approach | A systematic process yields better results and makes inspections easy. |
| Avoid costly shortcuts | Skipping steps or delaying washes can result in much higher repair bills later. |
Why pressure washing matters for apartment buildings
Most property managers understand that curb appeal influences leasing decisions. What's less obvious is how directly exterior cleanliness affects your bottom line across multiple dimensions. A clean building signals that management cares, and that perception drives both initial leasing and long-term exterior maintenance for apartments investment decisions.
Let's start with safety. Algae, mold, and grease accumulation on walkways and parking surfaces create genuine slip hazards. Regular pressure washing removes these hazards before they become incidents. One incident can cost far more than an entire year of cleaning contracts.
Then there's surface longevity. Regular maintenance costs roughly $5,000 per year compared to $50,000 or more for a full siding replacement. Dirt, mold, and pollutants break down exterior materials over time. Concrete spalls. Siding warps. Paint peels. Consistent cleaning slows all of it.
Tenant retention is the third lever. Residents notice when shared spaces look neglected. A dirty breezeway or stained parking lot tells them the property isn't well managed. The regular exterior cleaning benefits extend well beyond appearances — they directly influence whether a resident signs a renewal.
Here's a quick overview of what consistent pressure washing protects:
- Building facades and siding: Removes mold, mildew, and pollution staining
- Walkways and breezeways: Eliminates slip hazards and organic buildup
- Parking areas and garages: Clears oil, tire marks, and debris
- Entryways and lobbies: Creates a strong first impression for prospects and residents
- Dumpster pads and utility areas: Controls odor and pest attraction
For cleaning frequency, industry guidelines recommend sidewalks monthly, parking areas quarterly, and building exteriors one to two times per year. High-traffic urban properties may need more frequent attention.
"A well-maintained exterior is not just a cosmetic upgrade — it's a risk management strategy that protects residents, reduces liability, and extends the life of your most valuable assets."
Once you understand the stakes, it's vital to know why consistent, professional pressure washing delivers such high ROI for apartment properties.
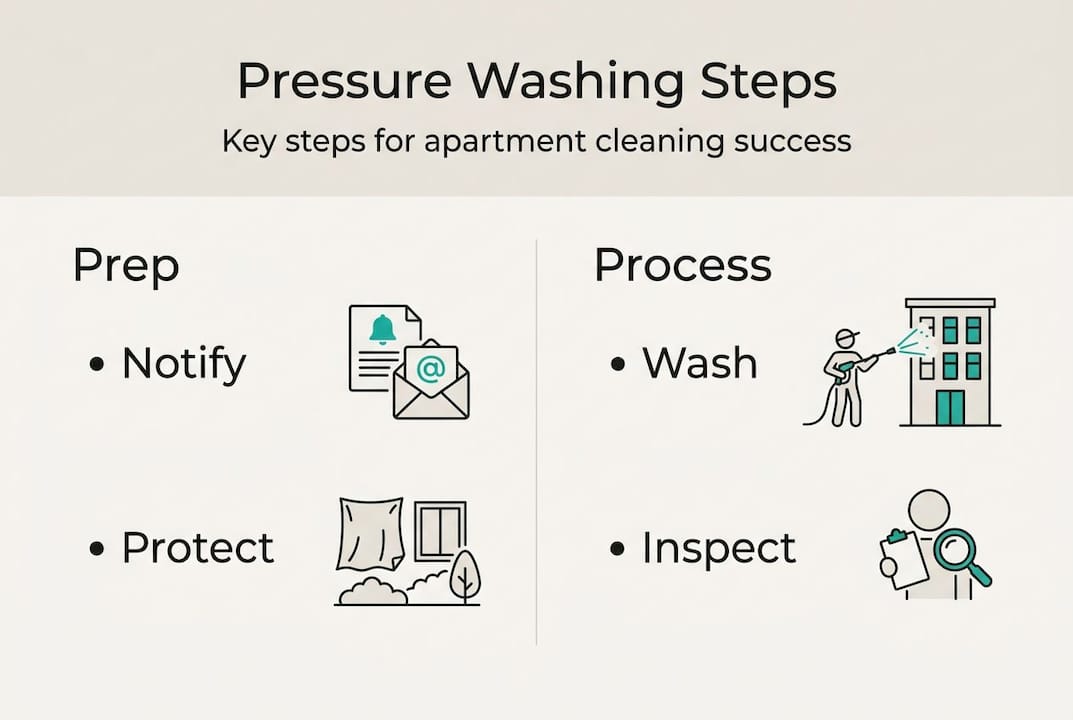
Preparation: Tools, materials, and safety essentials
With benefits clear, next is assembling the right tools and prepping your property. Skipping this phase is where most DIY or underprepared crews go wrong. The right setup prevents damage, protects people, and makes the actual washing faster and more effective.
Here's what you need on-site before water ever hits a surface:
- Pressure washer: Commercial-grade unit, 2,500 to 4,000 PSI for most exterior surfaces
- Nozzle set: 15-degree for concrete, 25-degree for general surfaces, 40-degree for delicate areas
- Surface cleaner attachment: Speeds up flat surface work and reduces streaking
- Degreasers and detergents: Alkaline cleaners for organic stains, degreasers for oil and grease
- PPE: Safety glasses, non-slip boots, waterproof gloves, hearing protection
- Wet floor signage: Placed at all entry points and access routes
- Plastic sheeting and tape: To protect landscaping, electrical panels, and light fixtures
Scheduling is often overlooked during prep. Tailor your schedule based on area usage. Sidewalks need monthly attention. Exteriors can be cleaned one to two times per year. Plan cleaning during low-traffic windows, typically early mornings on weekdays, to minimize disruption for residents.
Always notify residents 48 hours in advance. Post notices at building entrances and on your property management portal. Coordinate with your maintenance team to ensure water shutoffs and electrical panels are clearly marked and protected before work begins.
Here's a quick reference table for equipment planning:
| Equipment | Primary Use | Recommended Frequency |
|---|---|---|
| Commercial pressure washer | Facades, concrete, parking | Per project |
| Surface cleaner attachment | Flat surfaces, walkways | Monthly to quarterly |
| Alkaline detergent | Mold, mildew, organic stains | Every wash |
| Degreaser | Oil stains, dumpster pads | Quarterly or as needed |
| PPE full set | Crew safety | Every wash |
| Wet floor signs | Resident and visitor safety | Every wash |
Pro Tip: Always assess exterior cleaning needs before ordering supplies. A walkthrough 24 hours before the job helps you identify problem areas, confirm access points, and adjust your equipment list accordingly.
"The best pressure washing jobs are won or lost in the prep phase. Rushing setup is the fastest way to damage a surface or miss a critical safety step."
Use a pressure washing checklist to confirm every item is staged and every area is protected before your crew starts.
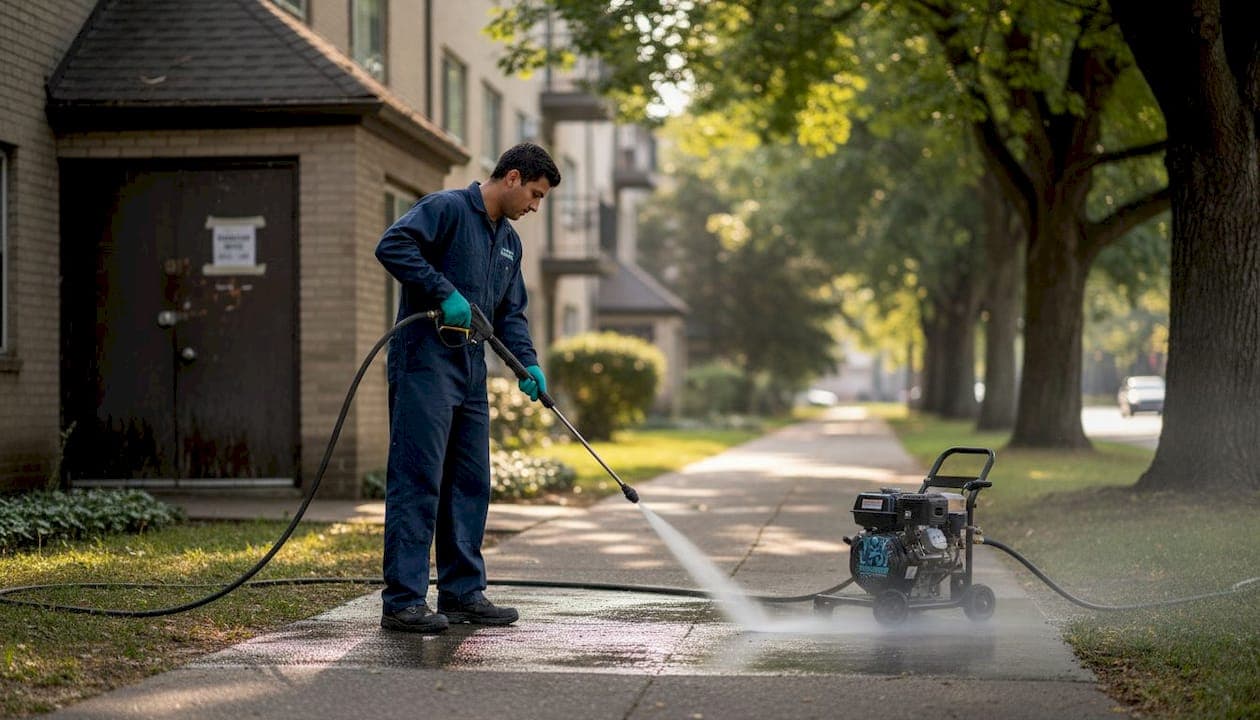
Step-by-step apartment building pressure washing process
Once you've got supplies prepped and safety covered, you're ready to tackle each step of high-impact pressure washing. A structured sequence prevents missed areas, surface damage, and rework.
- Clear and secure the area. Remove furniture, signage, and movable obstacles. Cordon off work zones with cones and wet floor signs. Confirm all residents and visitors are clear of the immediate area.
- Pre-treat stains and problem surfaces. Apply detergent or degreaser to heavily stained areas and let it dwell for five to ten minutes. Don't let it dry. This loosens organic material and makes the pressure washing significantly more effective.
- Protect non-target surfaces. Cover electrical outlets, light fixtures, HVAC intakes, and landscaping with plastic sheeting. Use painter's tape to seal edges.
- Test pressure settings. Start at a lower PSI on an inconspicuous area before committing to a full pass. Different surfaces require different pressure. Stucco and wood siding need far less pressure than concrete.
- Wash top to bottom. Start at rooflines and upper facades, then work down to lower walls, entries, and finally flat surfaces. This prevents dirty runoff from contaminating already-cleaned areas.
- Address walkways and entries last. Use a surface cleaner attachment for flat concrete. Overlap each pass by about 20% to avoid streaking.
- Post-wash inspection. Walk the entire property and flag any missed spots, streaks, or areas needing a second pass. Check for water intrusion around windows and doors.
For surfaces with heavy organic growth or delicate finishes, soft washing for multifamily properties is often the better choice. Soft washing uses lower pressure and specialized detergents to clean without risking surface damage.
| Method | Pressure | Best For | Risk Level |
|---|---|---|---|
| Traditional pressure washing | 2,500 to 4,000 PSI | Concrete, brick, parking | Low to medium |
| Soft washing | Under 500 PSI | Stucco, wood, painted surfaces | Very low |
Pro Tip: For breezeways and high-traffic walkways, prioritize slip hazard reduction by applying a post-wash anti-slip treatment to concrete surfaces prone to algae regrowth.
Follow a clear sequence: clear the area, pre-treat, test pressure, wash methodically, and inspect thoroughly. Skipping any step increases the chance of damage or incomplete results.
Troubleshooting and avoiding common mistakes
Following every step doesn't guarantee perfection. Knowing how to fix issues makes your results last and keeps your schedule on track.
Uneven cleaning is one of the most common complaints after a pressure washing job. It usually comes from inconsistent nozzle distance or overlapping passes that are too narrow. Walk each section systematically and maintain a consistent 12 to 18 inch distance from the surface.
Pressure damage shows up as etching on concrete, stripped paint, or gouged wood. If you notice surface damage mid-job, stop immediately, reduce PSI, and switch to a wider nozzle. Document the damage with photos before continuing.
Recurring stains, mold, or graffiti signal a deeper issue. Mold that returns within weeks usually means the surface stayed damp too long after washing or the source of moisture hasn't been addressed. For graffiti, specialized chemical removers applied before pressure washing produce far better results than pressure alone.
Scheduling lapses are the silent killer of exterior maintenance programs. Routine pressure washing prevents small problems from compounding into expensive repairs. Build your cleaning calendar into your property management software and set automated reminders 30 days before each scheduled service.
Here are the most common mistakes to avoid:
- Skipping the pre-treatment step on stained surfaces
- Using maximum pressure on all surfaces without testing first
- Washing in direct sunlight, which causes detergent to dry before rinsing
- Neglecting to protect electrical components and landscaping
- Failing to document results with photos for property records
Pro Tip: Use a property cleaning workflow to assign specific zones to specific crew members. This prevents overlap, reduces missed areas, and makes accountability straightforward.
Regular maintenance solves issues before they become costly repairs. A small investment in consistent cleaning is always cheaper than emergency remediation.
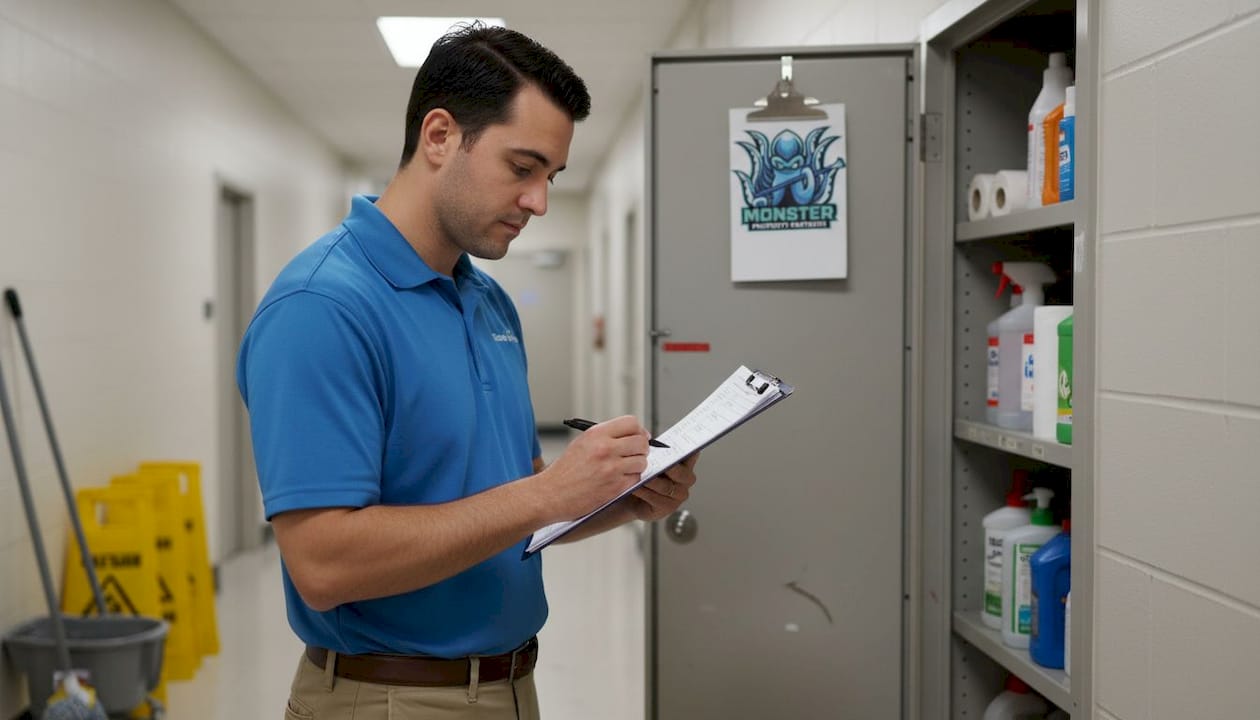
Verifying results and setting the right maintenance schedule
With typical pitfalls managed, the final step is verifying your work and setting future cleaning routines. A job isn't done when the crew packs up. It's done when you've confirmed the results meet your standards and documented everything for future reference.
Use this post-cleaning evaluation checklist:
- Appearance check: Walk every cleaned surface in good lighting. Look for streaks, missed spots, and residual staining.
- Safety check: Test walkway traction. Confirm no wet floor signs remain in place after surfaces dry.
- Tenant feedback: Send a brief survey or check in with your on-site team within 48 hours of cleaning.
- Photo documentation: Photograph before and after results for each major zone. Store these in your property records.
- Damage log: Note any surface issues discovered during or after washing for follow-up repair.
For scheduling, benchmark cleaning frequencies are a solid starting point: sidewalks monthly, parking areas quarterly, and building exteriors one to two times per year. Adjust based on your specific property conditions.
High-traffic urban properties near construction zones or busy roads accumulate grime faster. Coastal properties deal with salt air and humidity that accelerate mold growth. Properties in areas with heavy tree cover need more frequent attention to organic debris and staining.
Build flexibility into your schedule. After major storms or seasonal shifts, add a quick walkthrough to assess whether an unscheduled cleaning is warranted. A proactive approach to effective pressure washing steps keeps your property looking sharp year-round and reduces the risk of expensive surface repairs.
| Area | Recommended Frequency | Adjust For |
|---|---|---|
| Sidewalks and walkways | Monthly | High foot traffic, wet climates |
| Parking lots and garages | Quarterly | Oil spills, heavy vehicle use |
| Building exteriors | 1 to 2 times per year | Coastal exposure, mold-prone areas |
| Dumpster pads | Monthly to quarterly | Odor, pest activity |
Review the value of regular cleaning after each cycle to confirm your schedule is delivering the results your property needs.
Our perspective: The hidden ROI of methodical pressure washing for apartments
Here's what most articles won't tell you: the biggest cost in apartment exterior cleaning isn't the service itself. It's the cost of doing it inconsistently.
We've seen properties where management pressure washed once, saw great results, and then waited two years before doing it again. By that point, the mold had reestablished, the concrete had absorbed staining, and the job cost three times more than it would have on a regular schedule. Cutting corners on frequency looks like savings on paper. It rarely is.
The properties that get the most out of their cleaning budget are the ones that treat pressure washing as a system, not a one-time fix. Small, proactive steps, like monthly sidewalk cleaning and quarterly parking lot service, prevent the kind of buildup that requires aggressive treatments and longer labor hours.
Resident satisfaction is the metric most managers undervalue here. Clean common areas signal competent management. That perception directly influences lease renewals. We've seen the pressure washing impact on resident satisfaction surveys firsthand. It's not subtle. Properties that maintain consistent exterior cleanliness consistently outperform on retention metrics.
The ROI of methodical pressure washing isn't just in avoided repair costs. It's in the leases you keep.
Need professional pressure washing? We can help
If your property needs results without the coordination headache, Monster Property Partners delivers.
Our team specializes in multifamily exterior cleaning services for apartment complexes of all sizes. From building facades to common area concrete cleaning, we handle every zone with the right equipment, the right pressure, and a safety-first approach that protects your residents and your surfaces. We build custom cleaning schedules around your property's traffic patterns, climate exposure, and occupancy cycles so you're never overpaying or falling behind. Monster Property Partners is ready to become your long-term exterior maintenance partner. Reach out today to schedule a property walkthrough and get a tailored cleaning plan.
Frequently asked questions
How often should apartment buildings be pressure washed?
Most exteriors need pressure washing one to two times yearly, while high-traffic areas like sidewalks typically require monthly cleaning to stay safe and presentable.
What areas should be included in apartment building pressure washing?
Prioritize building exteriors, sidewalks, entryways, parking lots, courtyards, and shared spaces. Parking lots quarterly and sidewalks monthly is the standard benchmark for urban and suburban properties.
What are common mistakes to avoid during pressure washing?
Using too much pressure, skipping prep, and failing to protect sensitive surfaces are the most damaging errors. Regular maintenance prevents the kind of surface deterioration that forces costly emergency repairs.
Does regular pressure washing save money long term?
Absolutely. Spending $5k yearly on maintenance is a fraction of the $50,000 or more it costs to replace damaged siding or resurface deteriorated concrete.